Managing Blackouts
Blackouts suppress alert notifications during planned maintenance windows. Administrators create blackouts to prevent false alerts while performing database upgrades, schema changes, or infrastructure work. The AI DBA Workbench supports both one-time blackouts and recurring blackout schedules.
Blackouts operate at four hierarchical levels. A blackout at any level suppresses alerts for everything beneath the blackout in the hierarchy.
The following table describes the available blackout scopes:
| Scope | Target | Description |
|---|---|---|
| Estate | Entire installation | Suppresses alerts for all servers across all groups and clusters. |
| Group | Cluster group | Suppresses alerts for all clusters and servers within the group. |
| Cluster | Single cluster | Suppresses alerts for all servers within the cluster. |
| Server | Individual server | Suppresses alerts for only the specified server. |
The system enforces scope validation when creating or updating a blackout:
- Estate blackouts must not reference any group, cluster, or server.
- Group blackouts require a group identifier.
- Cluster blackouts require a cluster identifier.
- Server blackouts require a connection identifier.
Users with the manage_blackouts permission can create, update, delete, and
stop blackouts. All authenticated users can view active blackouts regardless of
their permissions. For more details about creating privileged users, visit
Managing Blackouts
Administrative users can create one-time blackouts from the status panel, or via the REST API. The header pane (across the top of the main console), which shows the selected server, cluster, or estate name, displays a halting-hand icon on the right side of the header.

Click the icon to open the Blackout Management dialog.
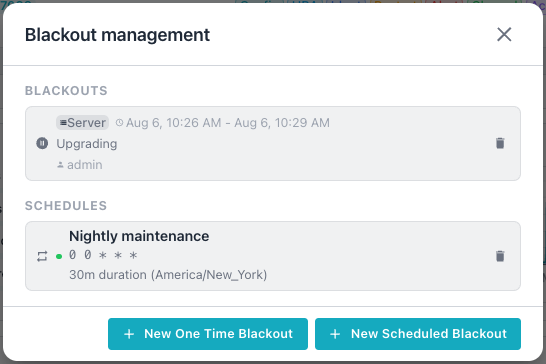
The Blackout management dialog displays current blackouts and currently
scheduled blackouts. The dialog also has buttons that allow you to create a
blackout in one of two modes; you can:
- Start a
New One Time Blackoutimmediately. - Create a
New Scheduled Blackoutwith a specified start time.
Starting a Blackout Immediately
Select New One Time Blackout from the Blackout management popup to specify
the details for a blackup that starts immediately:
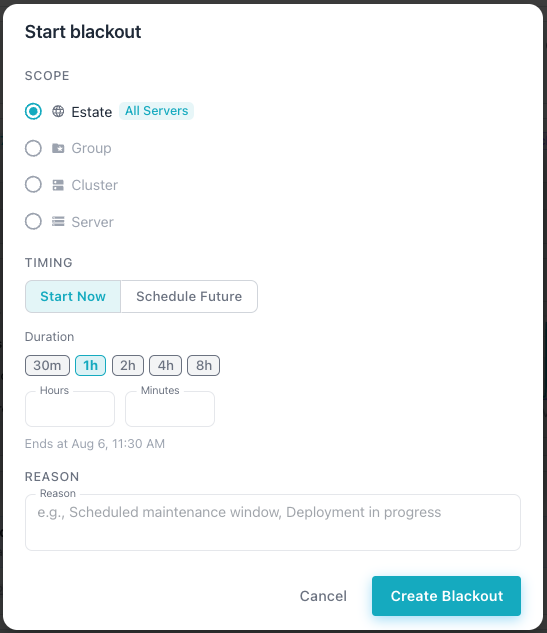
The Start blackout dialog lets you configure a one-time blackout for the
selected scope.
The SCOPE section lists four options: Estate, Group, Cluster, and
Server. Select a scope to suppress alerts at that level; the dialog
displays the target entity next to the selected option, such as the server
name for a Server scope.
The TIMING section offers two modes: Start Now and Schedule Future.
Selecting Start Now reveals a Duration section with five presets:
30m, 1h, 2h, 4h, and 8h. Enter a custom duration in the Hours and
Minutes fields instead of a preset. The dialog displays the computed end
time below the duration controls, such as Ends at Aug 6, 08:20 AM.
Enter a reason for the blackout in the REASON field, such as "Scheduled
maintenance window" or "Deployment in progress".
Select the Create Blackout icon to start the blackout, or Cancel to close the
dialog without creating one.
Scheduling a Blackout
Select New One Time Blackout from the Blackout management popup to specify
the details for a blackup that starts immediately:
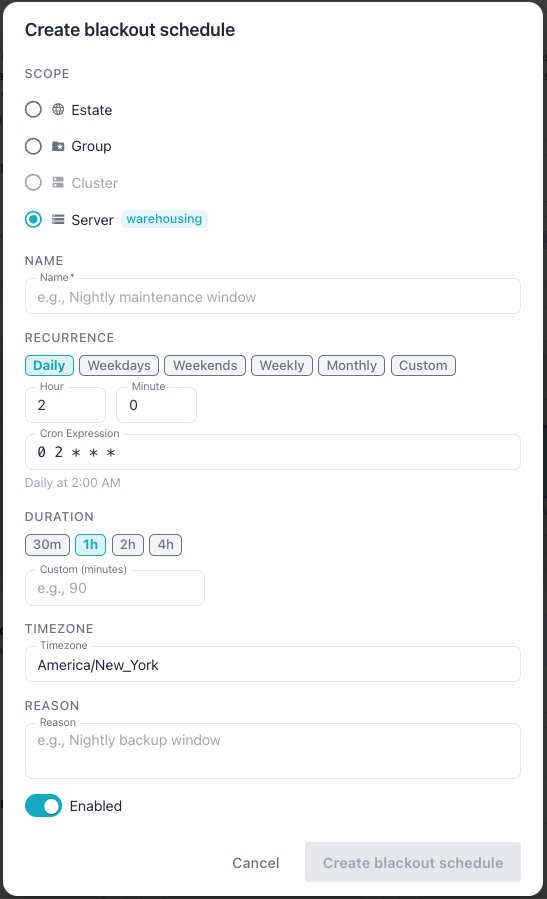
The Create blackout schedule dialog lets you configure a recurring
blackout for the selected scope.
The SCOPE section offers the same four options as the one-time blackout
dialog: Estate, Group, Cluster, and Server.
Enter a descriptive name for the schedule in the Name field, such as
"Nightly maintenance window". This field is required.
The RECURRENCE section offers six presets: Daily, Weekdays,
Weekends, Weekly, Monthly, and Custom. Selecting a preset populates
the Hour and Minute fields and the Cron Expression field
automatically. The dialog displays the resulting schedule in plain
language below the cron expression, such as Daily at 2:00 AM.
The DURATION section offers four presets: 30m, 1h, 2h, and 4h that
specify the length of the blackout. Optionally, enter a custom duration in
minutes in the Custom (Minutes) field instead of using a predefined
duration.
Enter the IANA timezone for cron evaluation in the TIMEZONE field, such
as America/New_York.
Enter a reason for the schedule in the REASON field, such as "Nightly
backup window".
Use the Enabled toggle to activate or deactivate the schedule.
When you've defined the blackout, select Create blackout schedule to save
the schedule, or Cancel to close the dialog without creating one.
Navigator Indicators
The Cluster Navigator displays blackout status on affected nodes in the navigation tree. A red pause icon appears on servers, clusters, and groups that have an active blackout; hover over the icon to review a tooltip confirming the blackout.
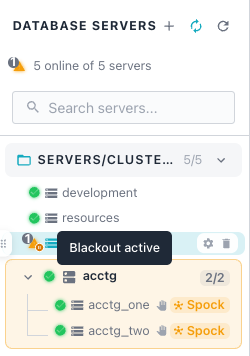
The icon appears at full opacity for direct blackouts. The icon appears at reduced opacity for inherited blackouts. Hovering over the icon shows whether the blackout applies directly or through inheritance from a parent scope.
Alert Suppression
The alerter checks for active blackouts before firing any alert. The following steps describe the suppression process:
- The alerter identifies the target server for the alert.
- The alerter checks for an active blackout at the server scope.
- The alerter walks up the hierarchy through cluster, group, and estate scopes.
- If any active blackout matches at any level, the alerter suppresses the alert.
- Suppressed alerts do not fire and do not generate notifications.
- When the blackout ends, normal alert evaluation resumes.